Monthly Archives: July 2014

Panko Fried Pickles

IMG_0678


If you were to tell my 7 year old self that someday I would be obsessed with pickles, 7 year old me would be very disappointed. As a child I was proud of my pickle hatred, scoffing in the face of my pickle loving friends, with a special abhorrence for the weirdest of weirdos, the pickle juice drinkers. HORK!


But then one fateful night in my mid-20s, sitting with friends having a beer at the Dundee Dell,  the words “Fried Pickles” floated up from the menu and smacked me in the face. Possessed by some unknown force (read: beer), I ordered them.  I ate one, and I was a pickle convert on the spot.


The fried pickles at the Dundee Dell aren’t all that special to be honest, but it was the first time I could ever tolerate those briny green “vegetables”, and from that day forward I was a pickle-o-holic. Fried pickles introduced me to regular pickles, which further fueled my fire for the fried ones. I get them anytime they’re on the menu. Inexplicably, the best fried pickles I’ve ever had were at a comedy club in town called the Funny Bone. Big, juicy dills, warm hot batter, but still a little cold on the inside of the pickle itself. Delicious.


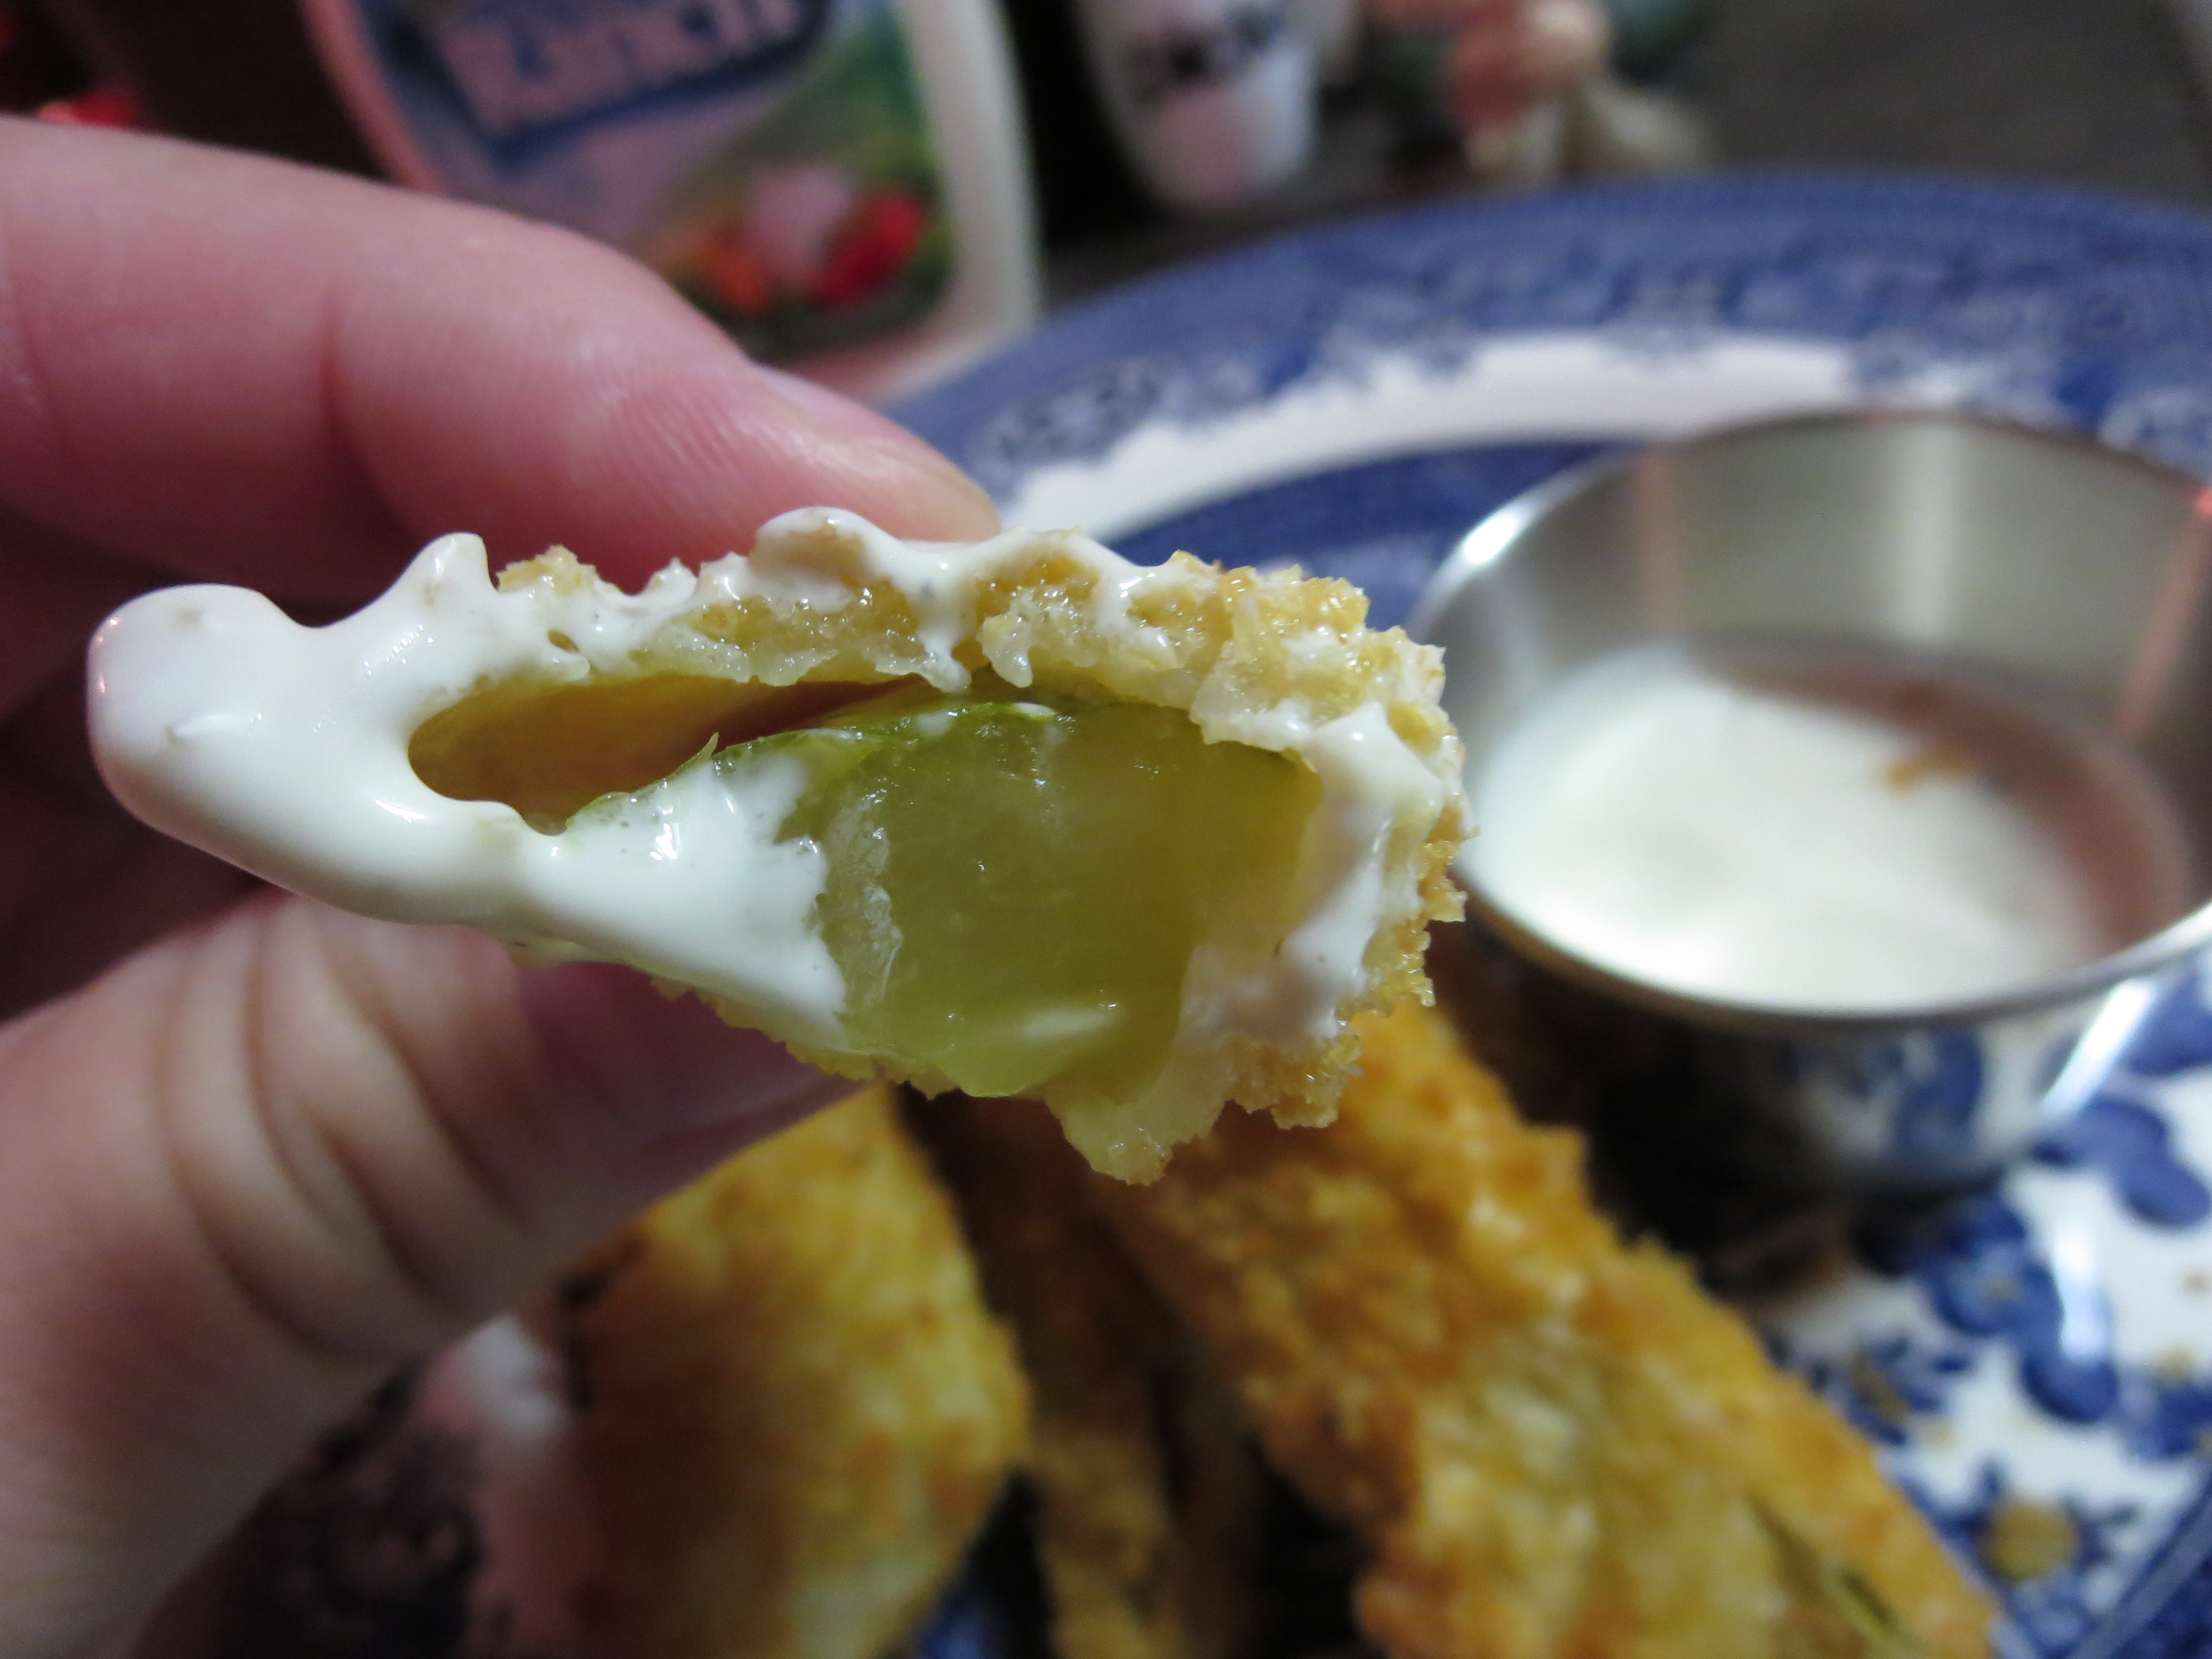
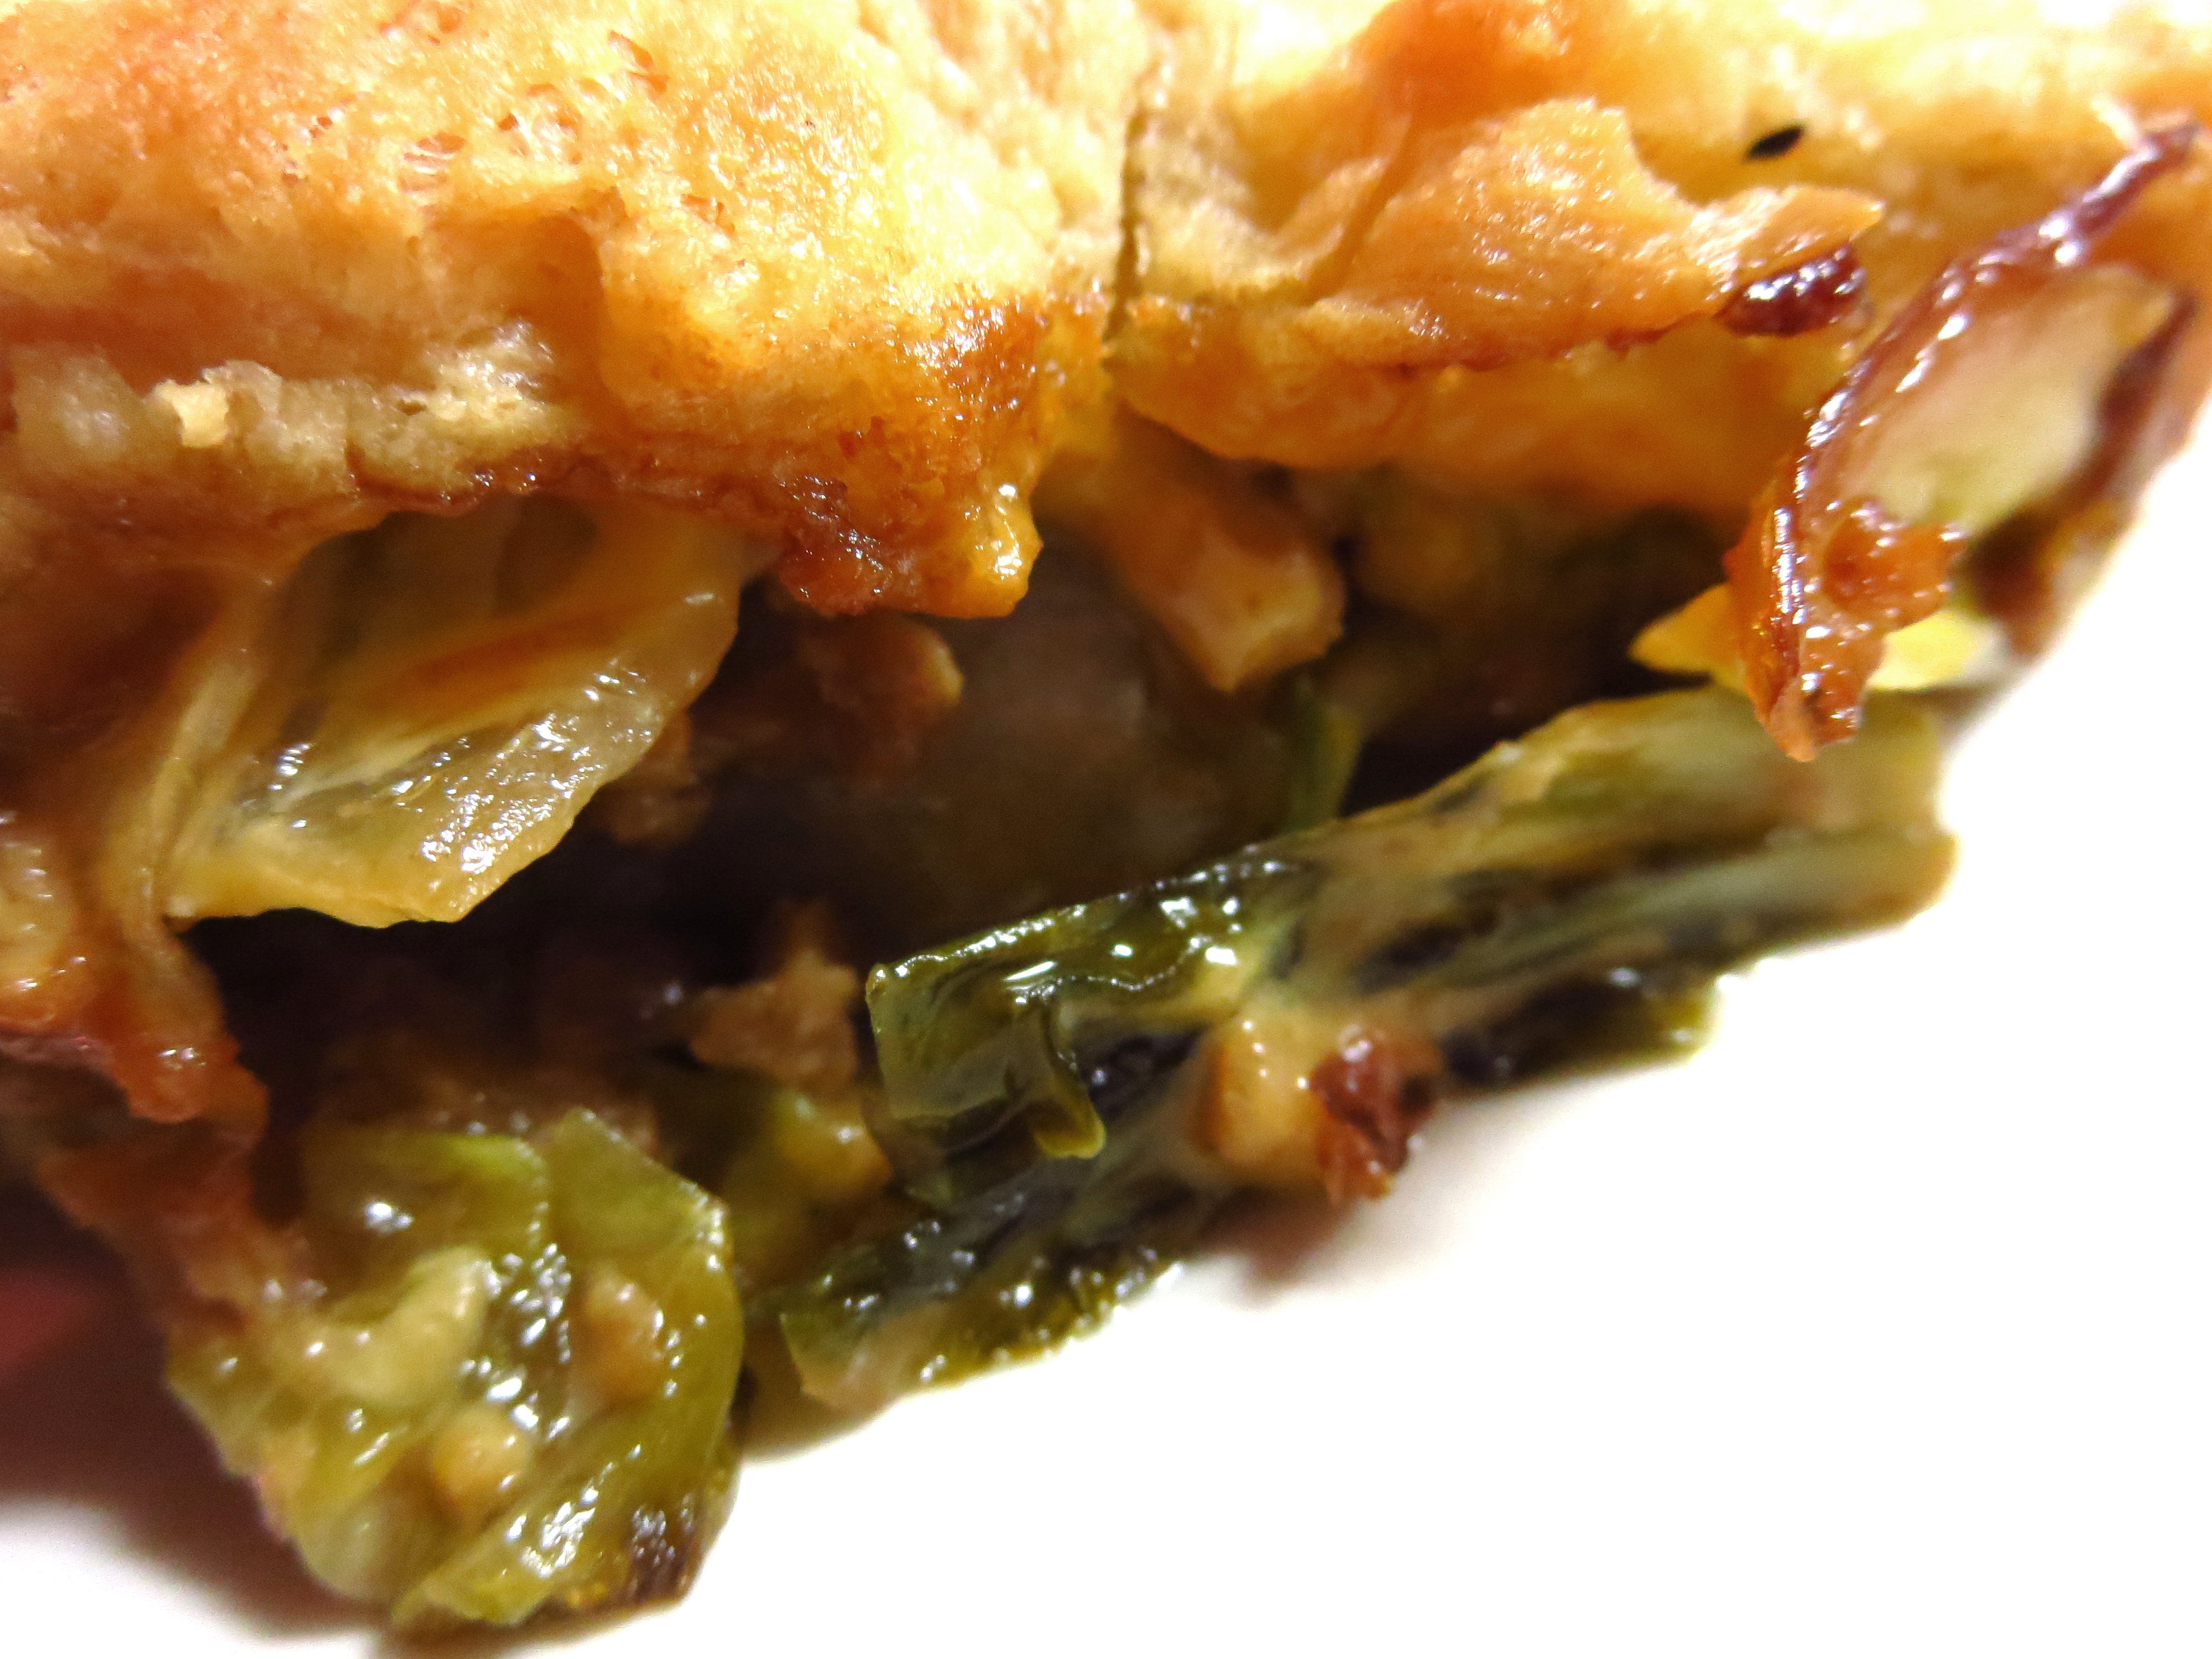
I think fried pickles are best with spears. Halves are too massive and chips get too soggy, and without the double crunch (first from the batter and second from the pickle) they lose some of their appeal. So, a few months ago when I set out to make my own, crunch is what I had in mind. I used Claussen dill spears, which are extremely crunchy, and Panko bread crumbs, infamous for their crunch. I used an old vegan fry trick by making a paste of flour and water for the first dredging (as opposed to buttermilk or an egg dip), then dredging the spears in Panko after.  I really cannot emphasize the amount of crunch these have. If you are a lifetime pickle lover, or maybe a convert like me, but have yet to try fried pickles, cooooooome to the green side.

IMG_0674 IMG_0676 IMG_0677 IMG_0680


Panko Fried Pickles

Ingredients

  • 6-8 dill pickle spears
  • 1 1/4 C Panko breadcrumbs
  • 1/4 t salt
  • 1/4 t garlic powder
  • black pepper to taste
  • 3/4 C flour
  • 2 C canola oil for frying

Directions

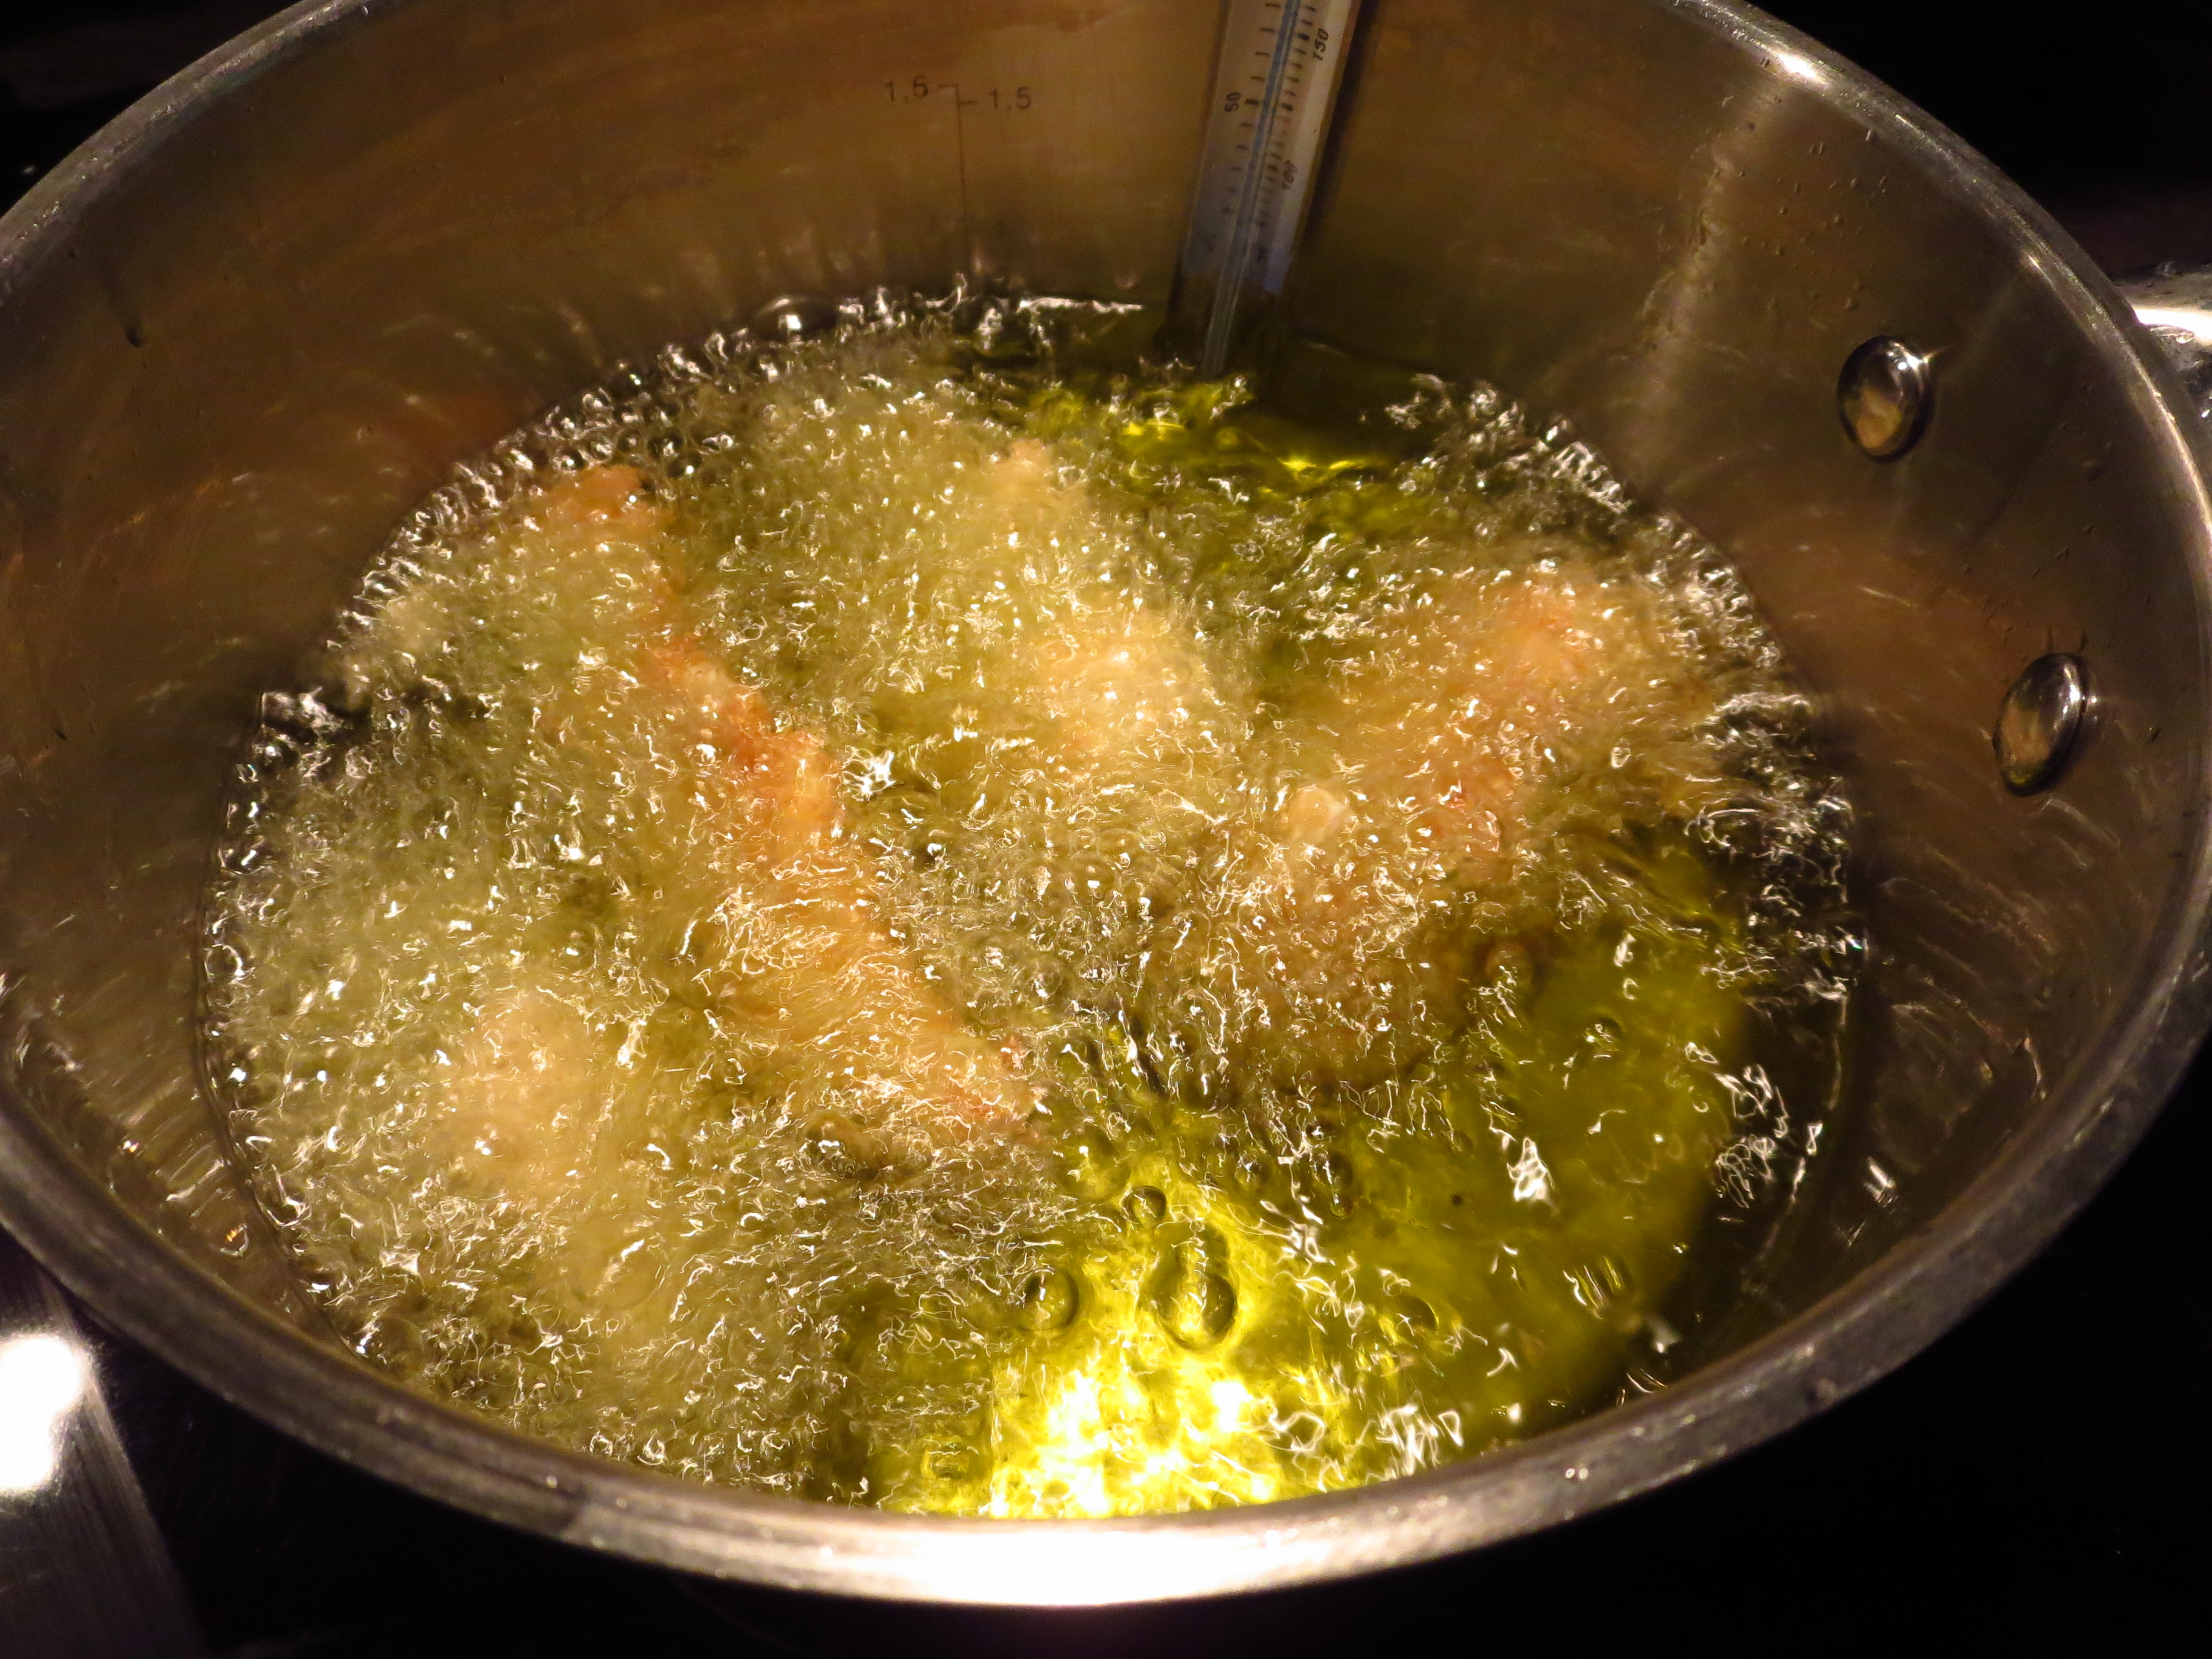
In a medium saucepan, heat the canola oil to 375 degrees using a kitchen thermometer. In a medium size bowl, mix the Panko, salt, garlic powder, and pepper. In another medium size bowl, add the flour and enough water to make a thin paste. Dredge pickle spears first in flour paste, letting the excess drip off. Next, coat the pickles in the Panko. I actually like leaving the excess Panko on because I like the fried pickles to be super crunchy.  Fry in batches (to maintain oil temp) 2-3 minutes on each side until golden brown. Place fried pickles on a paper towel to drain excess oil. Serve warm, preferably with copious amounts of ranch. 🙂

Summertime in Nebraska is…

…fresh corn on the cob and pink lemonade. ❤

IMG_0611

IMG_0634

Spicy Black Bean & Sriracha (Veggie) Burger

IMG_0562


I wish I could say I was a sriracha early adopter, but I was only slightly ahead of the sriracha craze. I started using it *before* supermarkets began hoarding the stuff to keep up with demand, but *after* it was a staple on all my cool friends’ tables.  I was always scared of spicy foods and didn’t see the point in enduring tastebud pain when a mild alternative was available. But sriracha changed all that for me. This thick, garlicy, bright red, confusingly sweet chili paste gives food more life, more depth, more passion. And if there’s one thing boring vegetarian food needs, it’s passion. Sriracha has made me crave spicy foods (with or without the stuff) and want to venture out of my comfort zone and put my taste buds through a little bit of discomfort in order to explore new flavors.


I don’t put sriracha on everything because it doesn’t go with everything. I’ve found it goes best with carby things. Noodle stir fries, baked potatoes, garlic bread, and in this case, a black bean veggie patty.


I used Morningstar Farm’s Spicy Black Bean burger. Speaking of which, here’s my quick rant on veggie burgers: They will never taste like hamburgers, and it’s kind of ridiculous to think they will. They should be thought of as their own food, with the term “burger” used loosely. They are round and fit a hamburger bun, yes, but if you can appreciate that they are made with their own ingredients, spices, and textures, not to copy a beef burger but to be their own separate food entirely, they are so much more enjoyable.


Aaaaanyway, I sautéed a small sliced onion in canola oil on medium heat, and when the onions were about 6 minutes away from being done (about 4 minutes into the sauteeing process), I added the burger, cooking 3 minutes on each side until slightly crispy. I like the flavor of cooking the burger in the same oil as the onions. I finished with a slice of Havarti cheese, which is quickly becoming one of my favorite types of melty, neutral cheeses. I piled everything up on a big, soft Rotella’s hamburger bun, then added several healthy squirts of sriracha on top. The sriracha acts as a flavor enhancer, almost like salt does. It brings out the flavors of the other foods–the spices in the burger were amplified, as was the crispiness of the onions and the soft bite of the bun.

 IMG_0604 IMG_0563

Preschooler-Created No Bake Nutella and M&M Granola Bars

IMG_0581


I’m a preschool teacher to 21 truly insane individuals. They’re all out of their minds in their own special ways, and it is my job to help guide them through this post-toddler consciousness so that hopefully they come out the other side as compassionate, educated, fresh-faced little conflict resolvers.


Because our school is a NAEYC accredited center, we create our lesson plans using emergent curriculum–or basing our projects on the interests of the children.  The theory is that if you teach what the children are naturally drawn towards, the learning will be that much more effective.


I can’t tell you how many times I’ve had to talk a child off a ledge when a bee flew by. They come up to me running and screaming and flailing about, then I’m forced to utter that famous childhood mantra, “Don’t bother them and they won’t bother you.” I usually throw in something about Ferdinand, too.  But no matter how many times I promised the kids the bees weren’t going to hurt them, they were still consistently terrified. So, I figured I’d teach them about bees–what they do, how they do it, what their babies look like, that there’s a queen(!)–and hoped their fears would lessen. And whodathunk, it worked! Instead of, “OMG A BEE,” it was, “Look, Ms. Emily, the bee wants pollen!”

232323232fp83232_uqcshlukaxroqdfv6__9=ot_243;=_;4=76;=XROQDF_2;5_652_87246ot1lsi

This is one of the projects we did during our several-week long unit on honey bees. It’s a life-sized beehive with larva (cut up white straws curled up in the honeycomb), anatomically correct drawings of adult bees, a queen (she’s in the hive, wearing a crown, naturally), pollen packed into the cells (the orange circles), and honey (the yellow cellophane). As we learned about each of these things, we added it to our hive.  We even had a local honey producer give us a chunk of real honeycomb for the kids to study.

232323232fp83232_uqcshlukaxroqdfv87_7=ot_243;=_;4=76;=XROQDF_2;5_65335_246ot1lsi

To finish our unit, I thought it’d be a cool to do some cooking with honey. It was amazing how the kids had a whole new appreciation for honey compared to when we started. Half of them bring granola bars for breakfast, so I thought I could teach them how to make their own, and honey lends itself perfectly to that. We used this recipe, doubling it and subbing out the peanut butter for Nutella. The kids did all the work while I sat around and supervised to make sure there were actually M&M’s left for the recipe at the end, since they snuck them every chance they got.  The granola was truly delicious. Thanks, bees!

 IMG_0567 IMG_0568 IMG_0569 IMG_0570

IMG_0572

 IMG_0574 IMG_0575 IMG_0576 IMG_0577

   IMG_0583IMG_0584

1987

image

Sometimes I take out the blue M&M’s and pretend that I still have my whole life ahead of me.

Peanut Butter S’Mores Ice Cream Pie

IMG_0507


Gelatin is one of the most surprising non-vegetarian “foods”…if you can even call it that. Made from…well, I’ll skip the hork factor and let you read what it’s made from, if you’re morbidly curious. It’s a common ingredient in pliable or gummy foods like Skittles, packaged foods with icing (Pop Tarts icing, Frosted Mini Wheats icing), Starbursts, candy corn, gummy worms/bears, many yogurts, and anything containing marshmallow.


Thankfully though, the sugar gods (or in this case, Kraft) have an old vegetarian stand-by, Marshmallow Crème, so when I set out to make a S’Mores-themed dessert, Marshmallow Crème is what I reached for. I’d been wanting to make an ice cream pie for awhile, and with it being the middle of July, camping season is in full swing, which means torturous pictures of delicious, gooey looking campfire S’Mores all over social media and recipe sites.


This is my version! The best part of the whole dessert is the peanut butter ganache. I wanted a pb ganache recipe with less powdered sugar (it’s actually one of my least favorite sweet ingredients), so I frankenrecipe’d this version containing brown sugar. It really gives the ganache a deeper, darker flavor than plain powdered sugar.


Since I don’t own a kitchen torch, I had to get creative to toast my marshmallow topping. I sprayed a cupcake pan with non-stick cooking spray and spooned some marshmallow crème inside. I preheated the broiler and put the crème under for 45 seconds-1 minute, watching it the whole time to make sure it didn’t scorch and turn to ash. The final result tasted just like regular toasted marshmallow! The contrasting warmth of the toasted marshmallow with the freezing cold ice cream was a texture explosion!

 IMG_0496 IMG_0498

IMG_0500 IMG_0509

Peanut Butter S’Mores Ice Cream Pie

Ingredients

  • 1 store-bought graham cracker pie crust, or make your own
  • 3 C softened vanilla ice cream, or enough to fill your pie shell
  • 1 C peanut butter
  • 1/4 C butter (I used Earth Balance)
  • 1 1/4 C powdered sugar
  • 1/4 C brown sugar
  • pinch of salt
  • 7.25 oz bottle chocolate Magic Shell
  • Marshmallow Crème (see above for info)

Directions

Allow ice cream to thaw to the consistency of soft serve, 15-20 minutes out of the freezer. In a medium bowl, make the peanut butter ganache. Combine peanut butter, butter, powdered sugar, brown sugar, and a pinch of salt with mixer until light and fluffy, about 2 minutes. Spread peanut butter ganache on the bottom of a graham cracker pie crust. Next, gently spoon the softened vanilla ice cream over the ganache. Coat the ice cream with the Magic Shell to make hard layer over entire pie. Cover and place pie in freezer to set for 1 hour minimum, or until ice cream is hardened. When ready to serve, toast marshmallows. If you have a kitchen torch, spoon 2 T marshmallow crème onto each individual pie slice and toast until slightly blackened. Alternatively, preheat broiler. Spray a cupcake pan with non-stick cooking spray and spoon 2 T marshmallow fluff into each cup. Broil 45 seconds-1 minute until toasted, watching constantly to prevent scorching. Gently lift toasted marshmallow fluff from pan and place over pie slice. Serve immediately.


Runza Casserole, or Reason #4,238,543 why I love Nebraska

IMG_0484


Maybe you’ve never had a Runza. If you’re an adult and you’ve never tasted one, you probably wouldn’t be too impressed.  To fully appreciate a Runza–a fast food, breaded meat pouch filled with ground beef, cabbage, onions, and American cheese–there needs to be an element of nostalgia. “Remembered flavors” produce some of the strongest sensory emotions, as much as seeing an old photo of your childhood home, or running your fingers along the fuzzy fur of the teddy bear your grandmother gave you when you were 4. Remembered flavors are the definition of comfort food. They evoke a sense of peacefulness, security, and most importantly, home.


Nebraska is my home. Born and raised, I’ve lived here for all 32 years of my life. I’m not sure when the first time I had a Runza was, but I’m guessing, along with most Nebraskans, it was as soon as I could chew. When I became vegetarian 12 years ago, I relegated Runzas to a thing of my past, a comfort food I would never taste again, until just a few months ago when I was perusing a coworker’s Facebook and saw she had posted this recipe.


I made it the very next day. I used cheddar cheese at first, then a few days later, already addicted, tried swiss. They were both good, and both almost satisfied that childhood remembered flavor, but I finally did some research and discovered Runza itself uses American on its infamous Cheese Runza. I took one bite, closed my eyes, and after 12 years going without, Runza was finally back in my life.


Speaking of American Cheese: The secret to this dish is ignoring that small voice inside your head whispering screaming, “THAT IS WAY TOO MUCH AMERICAN CHEESE!” Runza, Inc. doesn’t listen to that voice, and neither should you. This is comfort food, after all, and one pan of this stuff will be your dinner, lunch, and leftovers for days.


IMG_0460 IMG_0462 IMG_0464 IMG_0467 IMG_0470 IMG_0476 IMG_0485 IMG_0481


Vegetarian Runza Casserole

Ingredients

  • 1 package Morningstar Farms crumbles
  • 1 head green cabbage, cored and large dice
  • 2 yellow onions, diced
  • 8 oz American Cheese
  • 2 tubes crescent rolls
  • 2 T butter (I use Earth Balance)
  • salt and black pepper

Directions

Preheat oven to 350 degrees. Melt 2 T butter in large stock pot. Add entire head of chopped cabbage, 1 t salt, and 1/2 t pepper. Saute on medium heat with lid on, stirring frequently until cabbage is very soft, about 20-25 minutes. Do now allow cabbage to brown much at all. For the last 5 minutes of sauteeing, remove lid to release moisture so that cabbage is not too watery. While cabbage is cooking, sweat onions in 1 T canola/vegetable oil. You want the onions to retain a bit of crunch. Add Morningstar Farms crumbles and heat through. Set aside. When cabbage is done cooking, combine beef/onion mixture to cabbage and mix well. Season again with salt and pepper, to taste. Layer one roll of crescents flat on the bottom of a 9×13 casserole dish (no need to grease). Spread cabbage/MSF crumble mixture on top. Put a single layer of the 8 oz of American cheese slices to completely cover the mixture. Top with remaining tube of crescent rolls, spread flat. Bake at 350 for 15-18 minutes until crescent rolls are golden brown.

Sunday Breakfast: Croissant French Toast

IMG_0457


I picked up a few croissants yesterday because they were on sale, and anytime I have an excuse for keeping croissants on hand, I jump on it.


This morning when I opened up the cabinet to pour myself a bowl of cereal, the Corn Chex sounded super boring for a Sunday morning breakfast. I remembered the eggs in the fridge were going to expire soon, so thought I’d make some French toast.


Egg Aside: I’m not a big egg fan. I got used to not using them in my 8 year history as a vegan, and when I reverted back to being vegetarian 4 years ago, I had totally lost my taste for them. Occasionally I’ll buy a carton if I want to make something where eggs can’t be substituted for anything else, but in general their cooked texture makes me want to vom. Alas…


…French toast! I remembered croissant French toast apparently being a thing now and decided to give it a try. It turned out delicious! It had just the right amount of fluffiness, and even when the croissants were dipped in the egg batter, you could still taste the individual, flaky layers. They did not get heavy or weighed down as sometimes happens when you use a delicate bread. I like to top my French toast with warmed peanut butter (to make a drizzle) and maple syrup.


IMG_0451 IMG_0454


Croissant French Toast

Ingredients

  • 3-4 store bought croissants
  • 3 large eggs
  • 1/4 C milk (I used rice milk)
  • 1/2 t vanilla extract
  • Pinch of ground cinnamon
  • Your choice of toppings (maple syrup, peanut butter, berry syrup, fresh berries, powdered sugar, etc)

Directions

    1. Whisk together the eggs, milk, vanilla, and cinnamon.
    2. Melt 1 T butter (I used Earth Balance) in a large skillet on medium heat.
    3. Split croissants lengthwise.
    4. Dip the croissant half in the egg mixture. Do not let the croissant sit in the mixture or become totally saturated as they will fall apart.
    5. Cook the croissant, cut side down, for 4-5 minutes until lightly brown. Flip and brown the top.
    6. Serve immediately or keep warm on a sheet tray in a 300 degree oven.
    7. When ready to serve, add your choice of toppings. I warmed 1 T peanut butter in the microwave for 30 seconds and drizzled it over the French toast, then topped it with pure maple syrup.


#13 Jimmy John’s Lunch

IMG_0441


Jimmy John’s has one of the most substantial vegetarian fast food sandwiches out there. I appreciate the fact that they actually put a little thought into making the sandwich taste good. Sounds obvious, but usually “The Veggie” at every restaurant consists of some terrible-textured whole wheat wrap thing smeared with hummus and filled to the brim with *hork* sprouts *hork*.


I get the #13, no lettuce, no mayo, add sauce (oil and vinegar). My husband likes the #13, add dijon. There’s also a cool avocado sauce hiding amongst all that provolone. I like to get a bag of Thinny Chips and stuff ’em in for a little crunch.


IMG_0438 IMG_0442

Southwest Cornbread Salad

IMG_0444


IMG_0445


Yesterday I made a bowl of this Southwest Cornbread Salad  to go along with riblets for dinner. I’m a carb junkie so any salad with a bread base is A++ (panzanella is my fave).   The whole dish could have been seasoned a little more strongly, maybe by adding less cumin and more–something–cayenne? A little heat would have made the dish more dynamic. All in all, it was a bright, summery side to go with our BBQ, but next time I’ll experiment with different spices.


Sidenote: Hopefully this was the last time for the summer I’ll have to buy a tomato. My plants are getting heavy with fruit. Ripen, tomatoes, ripen!